Over the past couple days I tried making homemade ginger ale using this recipe. It turned out really good! The two changes I made were to use half the yeast it called for, and also to start with a cup of sugar and a couple of cups of hot tap water, shaken together hard in the bottle to mix thoroughly and dissolve the sugar, then I added cold water and the rest of the ingredients.
I also vented the pop bottle several times over the 36 hours I let it sit at room temperature.
The ginger ale is refreshing and clean flavored. Even the kids like it.
Showing posts with label recipes. Show all posts
Showing posts with label recipes. Show all posts
Saturday, April 02, 2011


Wednesday, March 23, 2011
Seventeen years ago today...
... something interesting happened, but I'm having the hardest time remembering what it was.
Oh yeah, now I remember! My son Kieffer was born. He weighed 8 pounds 4 ounces. He was tall and thin. He had a lovely pair of lungs and was strong and healthy. He was then and is now very precious to us. Also he is still tall and thin.
In honor of Kieffer, I have a chocolate cake in the oven. It's an old recipe of my mother's and you can find it here.
Oh yeah, now I remember! My son Kieffer was born. He weighed 8 pounds 4 ounces. He was tall and thin. He had a lovely pair of lungs and was strong and healthy. He was then and is now very precious to us. Also he is still tall and thin.
In honor of Kieffer, I have a chocolate cake in the oven. It's an old recipe of my mother's and you can find it here.
Tuesday, February 01, 2011
Turkey Revenge
I was amazed at my friend Cathy's feats of thrift with a turkey that she made 10 meals/uses of (read about it here), and when I received a Braised Balsamic Chicken Breast recipe as my daily recipe from AllRecipes.com, I decided today was the day to thaw a turkey and see what I could do. Mine was just a 12-pounder (or so). And it was frozen solid, and when I pulled it out of the deep freeze, the bag it was in broke and dropped it down onto my bare foot. Duh. That's what I get for walking around barefoot in February. Anyway it didn't even hurt for about 15 minutes and then WOW.
I thawed Mister Turkey in a stock pot filled with warm salt water. I don't know if that's an approved method but it works well and I like the combining of steps, a quick thaw and a brine soak. I just finished boning out the turkey and put the bones in a stock pot with more water, carrots, onions and celery, plus a bay leaf and salt and pepper, and it's cooking away there. Tonight I plan to use one of the breast halves to make the Balsamic Chicken Breast recipe (turkey breast makes a great chicken breast substitute, just slice it up in chicken-breast-sized pieces), and tomorrow I'll make Cathy's Sticky Chicken Wings recipe, only I'll use the boned leg meat, and the other chicken breast I'll season and bake to make sandwich meat. The stuff on the stove now will be soup for another meal. I won't get anywhere near 10 meals out of this bird, but should get at least 4 or 5, counting leftovers (chicken fried rice is a great way to use up a little bit of leftover chicken or turkey meat).
I thawed Mister Turkey in a stock pot filled with warm salt water. I don't know if that's an approved method but it works well and I like the combining of steps, a quick thaw and a brine soak. I just finished boning out the turkey and put the bones in a stock pot with more water, carrots, onions and celery, plus a bay leaf and salt and pepper, and it's cooking away there. Tonight I plan to use one of the breast halves to make the Balsamic Chicken Breast recipe (turkey breast makes a great chicken breast substitute, just slice it up in chicken-breast-sized pieces), and tomorrow I'll make Cathy's Sticky Chicken Wings recipe, only I'll use the boned leg meat, and the other chicken breast I'll season and bake to make sandwich meat. The stuff on the stove now will be soup for another meal. I won't get anywhere near 10 meals out of this bird, but should get at least 4 or 5, counting leftovers (chicken fried rice is a great way to use up a little bit of leftover chicken or turkey meat).
- Braised Balsamic Turkey Breast
- Sticky Turkey
- Turkey sandwiches (2 meals' worth at least)
- Turkey salad
- Turkey Fried Rice
- Turkey Soup
******
Later:
Balsamic Braised Whatever is delicious! Of course I realized I was short on many key ingredients so mine's different. Here is my version:
4 roma tomatoes, chopped
Basil, oregano and marjoram to taste
1/2 c. rice vinegar
1/4 c. sugar
4 turkey breast cutlets
1 onion, sliced thinly
olive oil
salt
pepper
garlic powder
Toss the chopped tomato with the basil, oregano and marjoram. Add the vinegar and sugar; stir. Set aside.
Heat 2 tablespoons olive oil in a heavy frying pan. Add the onion slices and sautee for a minute or two. Meanwhile, sprinkle the turkey cutlets with salt, pepper and garlic powder. Lay each one on top of the onions in the frying pan. Brown the turkey cutlets on both sides. Then spoon all the tomato mixture on top of them, turn the heat down to low and let the mixture simmer till the turkey meat is no longer pink in the middle.
Serve with rice and orzo, with green beans on the side. Makes 4 servings.
Tuesday, November 23, 2010
Pressure canning turkey
I'm trying something new (to me, at least). Right now I have about 30 pounds worth of turkey (2 birds, one large, one small) in a big stock pot with some herbs. I cut the turkeys apart but left the bones in. My plan is to cook them till nearly done, but not completely, strip the meat off the bones and pressure can it with its broth. I love the idea of having already cooked turkey meat ready to put into a recipe without defrosting. The freezer is also pretty full at the moment, and I want to make sure I keep a balance between canned and frozen foods anyway.
I'll let you know how it goes.
UPDATE: Two birds, 30 pounds dressed raw weight, ended up to be - drumroll please - about 7 quarts of cooked, boned meat. Wow. I thought it would be at least twice that.
Quarts are in the canner now for 90 minutes at 15 PSI. The bones are saved and I think I'll cook them in the remaining broth (what I didn't use in the quarts) some more after the stove is available again.
I'll let you know how it goes.
UPDATE: Two birds, 30 pounds dressed raw weight, ended up to be - drumroll please - about 7 quarts of cooked, boned meat. Wow. I thought it would be at least twice that.
Quarts are in the canner now for 90 minutes at 15 PSI. The bones are saved and I think I'll cook them in the remaining broth (what I didn't use in the quarts) some more after the stove is available again.
Wednesday, November 17, 2010
Gift on the Hoof
We were given a wonderful gift this weekend: Our friend Conrad had friends visiting from Texas to bow hunt. They took a buck and a doe. Conrad knew things were tight for us this year and when his friends said they would like to give the meat away to someone who needed it, he called us. We took home the doe. She was a lovely, healthy, fat girl who had been shot right neatly through one shoulder and out the other, and she must have just dropped. So the meat was very, very good.
You may remember that I cut and wrapped a lamb last fall, so I had probably way too much confidence in my butchering abilities. I said I would do the cutting myself. I messed up the skinning part. Inexperience combined with inadequate knives meant that I went too deep into the muscle when I started my skinning cuts and it was hard to get back from that. I'm not sure the hide is any good after what I put it through.
But after that, I did pretty well, if I may say so myself. I used the instructions found on Eckrich.org. Very clear, with good photos and idiot-proof instructions. (Good thing.) It's all done now except for the 4 quarts of stock that are right now processing in my pressure canner, then it'll be all done.
I'll do a yield list again, like I did with the lamb, mostly for my own edification:
Breakfast sausage, total 11 pounds
Hamburger, total 8 pounds
Eyes of round, tied into a tender roast, just under 2 pounds
Bottom round, 1-3/4 lb.
Rump for stir fry, 2 packages, total about 2.6 pounds
Top round roast, about 2.6 pounds
Sirloin cubes for venison burgundy*, about 3-1/4 pounds
Bottom round cubes for burgundy*, about 2-2/3 pounds
Loin roasts, tied into a tender roast, just over a pound
Butterfly steaks, total 11 in 2 packages, total just under 4 pounds
7 quarts of canned venison chunks
4 quarts venison stock
rendered venison tallow, about 4-2/3 pounds
Total yield on the meat was about 44 pounds.


I used my trusty 1940s Dormeyer Power Chef mixer with its grinder attachment to grind all the meat for the hamburger and sausage, and it never even got warm. It's amazing.
 * This is for Barry's favorite venison dish, which is beef burgundy prepared in a pressure cooker, only of course you use venison instead of beef. I have to say, it is pretty wonderful. It came from Pressure Cooking for Everyone
 by Rick Rodgers and Arlene Ward, a cookbook my sister in law Roseann recommended.
You may remember that I cut and wrapped a lamb last fall, so I had probably way too much confidence in my butchering abilities. I said I would do the cutting myself. I messed up the skinning part. Inexperience combined with inadequate knives meant that I went too deep into the muscle when I started my skinning cuts and it was hard to get back from that. I'm not sure the hide is any good after what I put it through.
But after that, I did pretty well, if I may say so myself. I used the instructions found on Eckrich.org. Very clear, with good photos and idiot-proof instructions. (Good thing.) It's all done now except for the 4 quarts of stock that are right now processing in my pressure canner, then it'll be all done.
I'll do a yield list again, like I did with the lamb, mostly for my own edification:
Breakfast sausage, total 11 pounds
Hamburger, total 8 pounds
Eyes of round, tied into a tender roast, just under 2 pounds
Bottom round, 1-3/4 lb.
Rump for stir fry, 2 packages, total about 2.6 pounds
Top round roast, about 2.6 pounds
Sirloin cubes for venison burgundy*, about 3-1/4 pounds
Bottom round cubes for burgundy*, about 2-2/3 pounds
Loin roasts, tied into a tender roast, just over a pound
Butterfly steaks, total 11 in 2 packages, total just under 4 pounds
7 quarts of canned venison chunks
4 quarts venison stock
rendered venison tallow, about 4-2/3 pounds
Total yield on the meat was about 44 pounds.
I used my trusty 1940s Dormeyer Power Chef mixer with its grinder attachment to grind all the meat for the hamburger and sausage, and it never even got warm. It's amazing.
* This is for Barry's favorite venison dish, which is beef burgundy prepared in a pressure cooker, only of course you use venison instead of beef. I have to say, it is pretty wonderful. It came from Pressure Cooking for Everyone by Rick Rodgers and Arlene Ward, a cookbook my sister in law Roseann recommended.
Tuesday, November 16, 2010
Wednesday, November 10, 2010
Steam Juicing Apples and Pears
 |
| Here are the parts of my steam juicer. 1) Water reservoir. 2) Juice pan with siphon tube. 3) Strainer basket. 4) Lid. |
 |
| First is the water reservoir. This goes directly on the stove and is filled about 2/3 with water. |
 |
| The juice pan is next. |
 |
| It has this little wire clip that I don't trust, having learned the hard way that it doesn't do its job very well. |
 |
| I direct it down into a Mason jar in the pot holder drawer. :o) |
 |
| You fill the strainer pan with fresh fruit. Here I mixed tart apples with sweet pears. Wash the fruit and trim away any bad spots, but no need to chop, pit or peel. I cut the apples and pears in half or fourths just because, but you probably wouldn't even need to do that much. |
 |
Okay, so, we put the lid on and light the stove. We bring the water to a boil, and when steam starts to escape from around the rim of the lid, we turn it down to a simmer. We steam apples for 90 minutes. Here they are after maybe half an hour. Interestingly, the pears are holding their shape better than the apples. Not what I would have guessed. If you like your juices clear, just let the fruit steam undisturbed. If you prefer it more unfiltered looking (and I do), stir the fruit every so often to break up the fibrous parts and infuse them into the juice. In fact, I pull off the juice and then run it back through the fruit again because I like a LOT of unfiltered stuff in my juice. |
 |
| After 90 minutes. Wow! That's what's left. The pears had much less residue than the apples did. I was hoping for more, actually. I love pear sauce. |
 |
| I forgot to take any pictures of the actual siphoning process, but it's just as well, as I burn myself every time anyway, without worrying about juggling a camera. Anyway, it comes out scalding hot, and if you siphon it directly into sterilized bottles or jars, you have a nice clean environment and don't need to water bath process afterward. Here you can see I appropriated some flip-top beer bottles Barry wasn't using. |
 |
| The leftover pulp gets run through a chinois strainer to make applesauce. Or, in this case, apple-pear sauce. That you do have to water-bath process, as by the time it's in the jars, it's well below scalding temperature and has been in contact with numerous preparation surfaces (chinois, bowl, spoon, etc.). |
 |
| Meanwhile, I'm firing up the steamer again, this time with just pears. Don't forget to replenish the water in the water reservoir. You do not want this thing to cook dry. |
 |
| And here's the yield from two steamer fulls of first apples and pears, then just pears. If I had used all apples, there would have been more yield. This is where you can see how a larger juicer would make sense, as I used a lot of energy doing this twice when one large steamer could probably have held more than the two loads I did. |
Friday, October 29, 2010
Thursday, October 14, 2010
Made apple juice (and applesauce as a byproduct) instead of working this morning.
Work has been pretty slow, and we've been called off in the mornings, when I usually work, to defer our time till later in the afternoon when more rolls in from the western half of the country, and that happened today. So I spent my morning baking bread and also making apple juice with my new steam juicer. (The link is informational; I got mine for quite a bit less money on eBay.)
I still have quite a few tart green apples from the neighbor's tree, and they're great for pies and crisps but not so great for juice, which is supposed to be sweet, so I picked up a couple of pecks of Jonathan apples from Leidel's Apple Stand in La Crescent, and another half bushel from a vendor at the farmer's market there, a pretty red apple with a lovely crunch, called a Scarlett O'Hara. I'm not sure Barry will let me juice those, however; he really likes them as eating apples. I also bought a half bushel of delicious little green pears that aren't all ripe yet, but the ones we have been able to eat have been wonderful.
So anyway, I was turned on to steam juicing by Judy Laquidara. She has many, many good ideas and inspires me. She has a large, stainless steel steam juicer, but I wasn't ready to spend that kind of money since I had never used one before. But I figured this one would be worth its while very quickly considering how many apples there are around here. A steam juicer is sort of like a giant percolator, only it's steam that percolates through the top, not hot water. It has several chambers stacked vertically, starting with water in the bottom, to produce the steam, then a juice collecting chamber, and on the top, a colander for fruit. You put your fruit in the colander part (apples get cut in halves or fourths, but that's all you do, no peeling or coring), put it on the stove and let the water produce steam for awhile. The fruit will cook in the top and release its juice, which drips through the colander into the juice collection chamber, and from there, you can pour it off using a rubber tube. It comes out scalding hot, so you can pour it directly into sterilized bottles or jars and seal it. If you are very gentle with the fruit and don't stir it at all, the juice will be clear, but I like my apple juice to have some fruit in it, so I stirred the fruit around to let some of the solids mix into the juice.
With apples, after you get out all the juice you're gonna get, you are still left with a lot of apple pulp. If you run that through a chinois, then you have applesauce. Sort of a byproduct of juicing. :o) I like applesauce, but I don't love it, and the kids think it's either baby food or something you eat when you're getting over the flu, so it is not a very popular item around here. I'm hoping, since I have so much of it now, to get in the habit of using it in baking. I hear you can substitute apple sauce for oils in baking pretty much one for one and still have moist baked goods without the added fat.
The juice is wonderful, by the way.
I still have quite a few tart green apples from the neighbor's tree, and they're great for pies and crisps but not so great for juice, which is supposed to be sweet, so I picked up a couple of pecks of Jonathan apples from Leidel's Apple Stand in La Crescent, and another half bushel from a vendor at the farmer's market there, a pretty red apple with a lovely crunch, called a Scarlett O'Hara. I'm not sure Barry will let me juice those, however; he really likes them as eating apples. I also bought a half bushel of delicious little green pears that aren't all ripe yet, but the ones we have been able to eat have been wonderful.
So anyway, I was turned on to steam juicing by Judy Laquidara. She has many, many good ideas and inspires me. She has a large, stainless steel steam juicer, but I wasn't ready to spend that kind of money since I had never used one before. But I figured this one would be worth its while very quickly considering how many apples there are around here. A steam juicer is sort of like a giant percolator, only it's steam that percolates through the top, not hot water. It has several chambers stacked vertically, starting with water in the bottom, to produce the steam, then a juice collecting chamber, and on the top, a colander for fruit. You put your fruit in the colander part (apples get cut in halves or fourths, but that's all you do, no peeling or coring), put it on the stove and let the water produce steam for awhile. The fruit will cook in the top and release its juice, which drips through the colander into the juice collection chamber, and from there, you can pour it off using a rubber tube. It comes out scalding hot, so you can pour it directly into sterilized bottles or jars and seal it. If you are very gentle with the fruit and don't stir it at all, the juice will be clear, but I like my apple juice to have some fruit in it, so I stirred the fruit around to let some of the solids mix into the juice.
With apples, after you get out all the juice you're gonna get, you are still left with a lot of apple pulp. If you run that through a chinois, then you have applesauce. Sort of a byproduct of juicing. :o) I like applesauce, but I don't love it, and the kids think it's either baby food or something you eat when you're getting over the flu, so it is not a very popular item around here. I'm hoping, since I have so much of it now, to get in the habit of using it in baking. I hear you can substitute apple sauce for oils in baking pretty much one for one and still have moist baked goods without the added fat.
The juice is wonderful, by the way.
Wednesday, September 01, 2010
Sunday, August 22, 2010
Crock pot sloppy joes
Mary Hunt's Everyday Cheapskate is an email list you can join where you get debt free living tips nearly every day. It's free. I don't always find something valuable, but probably 50% of the time, I do.
Friday's included some slow-cooker recipes. I made this one for supper that night, using 1-1/2 pounds of ground venison rather than beef, and it was really good. (We are also out of Worcestershire sauce AND prepared mustard - I really need to go grocery shopping! - so those were left out.)
1 1/2 pounds ground beef, browned
1/2 onion, chopped
1 tablespoon minced garlic, fresh or from a jar
2/3 cup ketchup
2 1/2 tablespoons Worcestershire sauce
2 tablespoons brown sugar
1 1/2 tablespoons vinegar
1 1/2 tablespoons prepared mustard
1 teaspoon chili powder
Combine all ingredients in a slow cooker. Cook on low for 6 hours. Serve on warmed buns with chips and celery sticks with Ranch dressing. Serves: 6.
Friday's included some slow-cooker recipes. I made this one for supper that night, using 1-1/2 pounds of ground venison rather than beef, and it was really good. (We are also out of Worcestershire sauce AND prepared mustard - I really need to go grocery shopping! - so those were left out.)
Slow-Cooked Sloppy Joes
1 1/2 pounds ground beef, browned
1/2 onion, chopped
1 tablespoon minced garlic, fresh or from a jar
2/3 cup ketchup
2 1/2 tablespoons Worcestershire sauce
2 tablespoons brown sugar
1 1/2 tablespoons vinegar
1 1/2 tablespoons prepared mustard
1 teaspoon chili powder
Combine all ingredients in a slow cooker. Cook on low for 6 hours. Serve on warmed buns with chips and celery sticks with Ranch dressing. Serves: 6.
Thursday, July 22, 2010
Red Currant Jelly recipe

1 c. water
7 c. white sugar
1 box powdered Sure-Jell fruit pectin
Sterilize about 10 half-pint canning jars and lids. Keep them in simmering water while you prepare the jelly. When the jelly is nearly done, up-end the hot jars on a clean towel to drain before filling.
Place the currants and water into a heavy bottomed saucepan with plenty of room for expansion. Use a potato masher to break up the fruit while you bring the pot to a boil, then reduce the heat to a strong simmer for 10 minutes. Remove from heat.
Strain the fruit and liquid through a fine strainer, then strain the juice through cheesecloth. Measure out 5 cups of the juice. If you don't have quite enough, make up the difference with water.
In a large heavy saucepan, stir the sugar and pectin together, then pour in the juice while stirring till the sugar is mostly dissolved. Place the pan on high heat, bring the juice to a boil, and boil hard for 2 minutes. Immediately turn off the heat. Skim off the foam and discard it.
Pour the hot liquid (carefully) into the prepared jelly jars, leaving 1/2 inch of space at the top. Wipe the rims of the jars with a clean, damp washcloth to remove any spilled jelly, then place the lids and caps.
Process the filled jars in a boiling water bath for 10 minutes. Remove and cool. Label jars. Jelly will set up over the next few days and should be fully set within about 2 weeks.
Yield is about 9 half-pints (I always boil up a 10th jar just in case).
* Never double a jelly recipe. Make two batches instead. It ends not to set up right if you double it. Don't ask me why. It just does. You CAN make your currant juice all at once and then do the actual jelly-making in batches; that's what I did.
Wednesday, July 21, 2010
In the crock pot...
supper is simmering happily away. It's French dip courtesy of Nicole Reed's blog here. I'm also going to make onion rolls to serve as the bread portion of the sandwiches.
Tuesday, July 20, 2010
New recipe posted on the Keepers page: Crock Pot Tapioca
My sister in law Roseann served a delicious tapioca pudding that cooked while we were all away at church - in the crock pot. She got the recipe from our husbands' grandmother Emma Jean originally. It's now posted on the Keepers Page.
Friday, June 18, 2010
My Vintage Revere Ware Copper-Clad Pressure Cooker
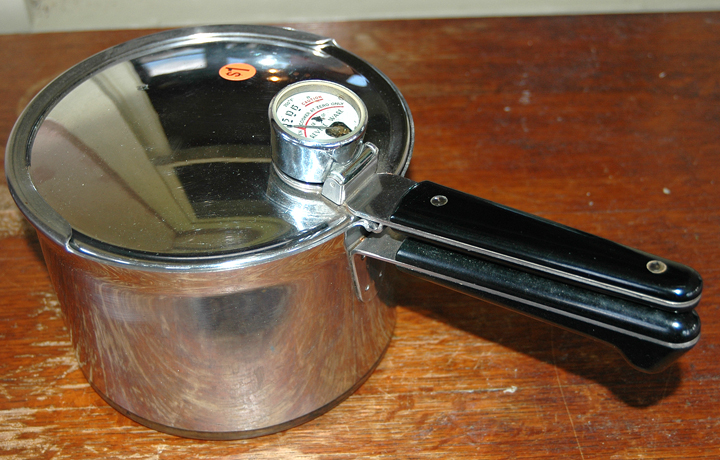
I tested it out with just water a few weeks ago and it worked beautifully. (Barry and I shooed the kids out of the kitchen and watched it nervously, but it worked fine.) And today I actually used it for the first time to cook some chicken breasts in oil, herbs and a little water, and they came out gorgeous and fragrant and tender.
Another example of how they used to make stuff to last.
Sunday, June 06, 2010
Strawberry Shortcake for a Crowd
Adapted from a recipe on allrecipes.com.
 Strawberry Shortcake for a Crowd
(makes about 80 servings)
Ingredients:
18 c. all-purpose flour
1-1/2 c. white sugar
1/2 c. baking powder
3 lb. salted butter
1 quart heavy cream
6 eggs, beaten
8 pounds strawberries
3 c. sugar
4 cans of aerosol whipped cream topping
1. Preheat oven to 350 degrees.
2 In a VERY large bowl, combine flour, 1-1/2 c. sugar and baking powder. Use a pastry blender to blend in the butter. Make a well in the center and add the beaten eggs and the heavy cream, and stir to blend.
3. Turn dough out onto a floured board and knead about 2 minutes. Then divide the dough into 4 parts. (If you prefer, divide the dough into 4 parts before the kneading to make the kneading easier.)
4. Pat the dough about 1/2 inch thick into 4 ungreased 15 x 10 inch jelly roll pans. Score the dough in 20 servings per pan.
5. Bake the shortcake about 20-25 minutes, till lightly browned.
6. Wash, hull and slice the strawberries. Toss them with the 3 c. sugar to allow the juice to release.
To serve, cut the shortcakes apart, then split them through the middle. Layer the bottom of the shortbread, then a spoonful of berries with juice, then the top of the shortbread and finally top with whipped cream. Serves about 80.

(makes about 80 servings)
Ingredients:
18 c. all-purpose flour
1-1/2 c. white sugar
1/2 c. baking powder
3 lb. salted butter
1 quart heavy cream
6 eggs, beaten
8 pounds strawberries
3 c. sugar
4 cans of aerosol whipped cream topping
1. Preheat oven to 350 degrees.
2 In a VERY large bowl, combine flour, 1-1/2 c. sugar and baking powder. Use a pastry blender to blend in the butter. Make a well in the center and add the beaten eggs and the heavy cream, and stir to blend.
3. Turn dough out onto a floured board and knead about 2 minutes. Then divide the dough into 4 parts. (If you prefer, divide the dough into 4 parts before the kneading to make the kneading easier.)
4. Pat the dough about 1/2 inch thick into 4 ungreased 15 x 10 inch jelly roll pans. Score the dough in 20 servings per pan.
5. Bake the shortcake about 20-25 minutes, till lightly browned.
6. Wash, hull and slice the strawberries. Toss them with the 3 c. sugar to allow the juice to release.
To serve, cut the shortcakes apart, then split them through the middle. Layer the bottom of the shortbread, then a spoonful of berries with juice, then the top of the shortbread and finally top with whipped cream. Serves about 80.
Monday, May 24, 2010
The Easiest, Bestest Focaccia Bread Ever!! - 27968 - Recipezaar
The Easiest, Bestest Focaccia Bread Ever!! - 27968 - Recipezaar
I thought for sure I blogged this before but then I couldn't find it when I needed it. My father recommended this focaccia recipe. He mixes and raises it in the bread machine, then shapes it and bakes it in the oven.
I didn't make up that title, by the way.
I didn't make up that title, by the way.
Tuesday, May 04, 2010
What's for Breakfast: Apple Fritters
 2 c. flour
1 c. white sugar
2 tsp salt
3 tsp baking powder
2/3 c. milk
2 eggs, lightly beaten
1 apple, peeled, cored and chopped
In a small skillet, heat about half an inch of vegetable oil. Meanwhile:
Mix the dry ingredients. Then mix the milk and egg together. Form a well in the dry ingredients. Pour in the milk and egg and mix with as few strokes as possible. Fold in the chopped apple.
Drop spoonfuls of batter into the hot oil. Fry on one side till puffy, then carefully turn using a slotted spoon and fry on the other side. Fritters are done when they are nicely browned all over and have puffed. Remove them to a paper-towel-lined plate using the slotted spoon and allow them to drain. Dredge the hot fritters in powdered sugar.Serve hot.

Hints:
- If you put your powdered sugar in a zip-top plastic bag or a plastic storage container with a tight-fitting lid, you can just put the fritters in the container, seal it and shake it to cover them evenly with powdered sugar.
- This goes a lot better if you set up an assembly line near the stove: Skillet with slotted spoon ====> paper-towel-lined plate ====> plastic container with powdered sugar ====> serving plate. Just keep the fritters moving down the line. In my house, you can add a fifth station, a teenager waiting at the end of the line with gaping maw, chowing down on fritters.
- Be very careful not to splatter the hot oil on yourself.
- These are supposed to be deep fried, but if you use a small frying pan and pan-fry them, you use a lot less oil. Do be watchful and add more oil if the fritters are soaking it all up. Allow the pan to return to heat before starting another set of fritters.
- I have to adjust my stove heat a lot. You want the oil hot enough to seal in the surface of the batter so it does not soak into the fritter too much, yet you also want it cool enough that the inside can bake before the outside gets too brown.

Friday, April 02, 2010
Friday, February 05, 2010
Coleslaw with Ramen noodles
Note that this recipe is not great on leftovers, as the noodles get soggy, so if you don't think you're likely to eat it all at once, try making it half at a time, reserving the second half as 3 mixtures - cabbage/onions, noodles/seeds, and dressing, for combining just before serving.Midwest Oriental Slaw1/2 head cabbage, shredded4 green onions, chopped1 package individual-serve Ramen noodle soup mix3 tablespoons toasted sesame seeds1/2 cup olive oil3 tablespoons red wine vinegar3 tablespoons white sugarMix the cabbage and onions in a bowl. Remove the noodles from the package of Ramen and break up the block of noodles into small pieces and toss with the cabbage mixture. Then mix in the toasted sesame seeds.In another bowl or, better yet, in a small jar you can close tightly and shake, mix the oil, vinegar and sugar plus the seasonings from the package of Ramen noodles. Stir or shake to mix, then pour over slaw and mix to coat.
Subscribe to:
Posts (Atom)